


A layered lighting plan anchored by a properly scaled chandelier or pendant cluster, supported by slope-rated recessed fixtures and wall-level light, gives you the most balanced and beautiful result in any vaulted or sloped ceiling space. The architecture is generous; the lighting just needs to meet it.
Here is what to know before you call an electrician or start shopping:
- Fixture types that work: Chandeliers, multi-tier pendants, adjustable gimbal recessed lights, track heads, and wall sconces each play a role. No single fixture type covers a vaulted room on its own.
- Sizing rule: Convert your room’s width in feet to inches for a starting chandelier diameter (a 16-ft-wide room calls for roughly a 16-inch fixture as a floor measurement, not a ceiling measurement). Tall vaults almost always need you to go larger.
- Safety check first: Slopes past a 3/12 rise-to-run ratio require slope-rated or adjustable gimbal housings. Where insulation contacts the fixture, you need an IC-AT rated housing. Confirm both before ordering.
Montreal Lighting & Hardware stocks slope-compatible fixtures and designer brands sized for tall volumes, with trade support for Canadian homeowners and design professionals.
Pro Tip: Write down your ceiling’s peak height, slope angle, and room width before you visit a showroom or browse online. Those three numbers answer most sizing and compatibility questions before they become problems.
Key Takeaways
A layered lighting plan with correctly sized, slope-compatible fixtures is the most reliable approach to vaulted ceiling lighting in any Canadian home.
| Point | Details |
|---|---|
| Layer your light sources | Combine a central chandelier or pendant with recessed gimbals and wall sconces for even, shadow-free coverage. |
| Size up for tall volumes | Convert room width in feet to inches for minimum fixture diameter; add 3 inches per foot of ceiling height above 12 ft. |
| Check slope and insulation ratings | Slopes past 3/12 require slope-rated or gimbal housings; IC-AT rated housings are required where insulation contacts the fixture. |
| Space recessed fixtures correctly | Place fixtures roughly 3 ft from walls and space them apart at approximately half the ceiling height in feet. |
| Montreal Lighting & Hardware | Stocks Crystorama, Savoy House, and Maxim fixtures with slope-compatible specs and trade support across Canada. |
Table of Contents
- 1. Why vaulted ceilings change every lighting decision you make
- 2. Which fixture types work best for vaulted ceiling lighting
- 3. Sloped-ceiling adapters and mounting hardware explained
- 4. Practical placement and spacing rules for vaulted ceilings
- 5. How to size a chandelier or pendant for a vaulted room
- 6. Bulbs, color temperature, dimming, and layering light in tall spaces
- 7. Room-by-room lighting ideas for vaulted spaces
- 8. Electrical safety, IC-AT ratings, and Canadian installation notes
- 9. Montreal Lighting & Hardware’s perspective on scale, brands, and trade support
- 10. What lighting designers get right that most homeowners miss
- 11. Where to find the right vaulted ceiling fixtures in Canada
- Sources
1. Why vaulted ceilings change every lighting decision you make
Flat ceilings are forgiving. A vaulted ceiling is not. The slope redirects light, stretches shadows, and pushes fixtures so far above the seating plane that a standard pendant can simply disappear into the volume above you.
Height and slope work against you in two specific ways. First, light from a recessed fixture on a steep slope travels at an angle, washing the ceiling rather than the floor unless the trim is adjustable. Second, the sheer volume of air above a 16- or 20-ft peak absorbs and scatters light, so the lumens-per-square-foot calculation you’d use for a flat 9-ft room falls short.
Exposed beams add a third variable. They create shadow bands that break up ambient light and make spacing even more important. Structural elements like ridge beams and collar ties also limit where junction boxes can go.
Three technical terms come up repeatedly when specifying fixtures for sloped ceilings. Slope is measured as rise over run (a 3/12 slope rises 3 inches for every 12 inches of horizontal run). IC-AT is an insulation-contact, air-tight rating for recessed housings, required wherever blown or batt insulation touches the fixture. CRI (Color Rendering Index) measures how accurately a light source renders color; 90+ CRI is worth specifying in living spaces where you want finishes and furnishings to look their best.
Spacing and lumen guidance based on PacLights recessed layout recommendations and Mullan Lighting’s layered approach guidance.
2. Which fixture types work best for vaulted ceiling lighting
The right fixture depends on what the space needs to do. Here is how each category fits in.
Chandeliers and multi-tier fixtures
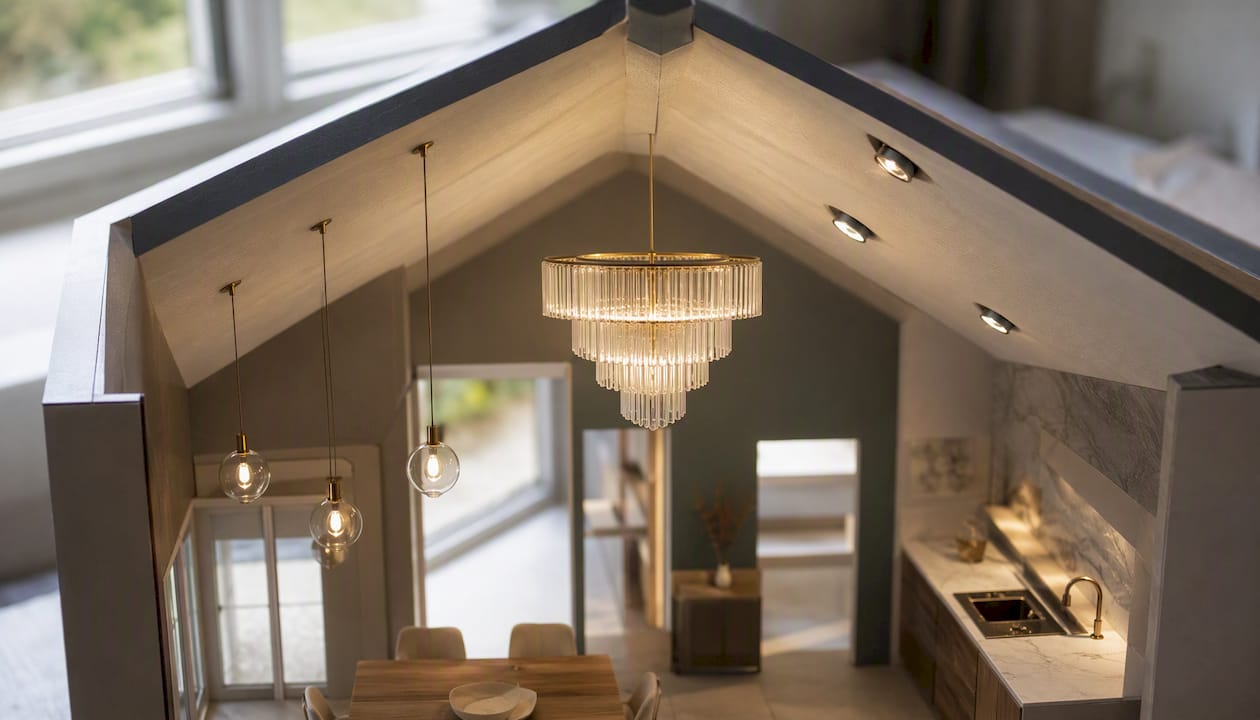
These are the natural anchors for great rooms, double-height foyers, and open-plan living areas. A multi-tier or branching chandelier extends vertically, which means it stays readable from the seating plane even when the peak is 18 or 20 feet up. Single-tier drum shades and flush mounts tend to vanish at that height.
Pendants and linear pendants
Pendants work best over dining tables, kitchen islands, and reading nooks where you want focused, warm light at a human scale. A cluster of three pendants staggered at slightly different drop heights adds visual rhythm without overwhelming the room. Linear pendants and LED cove strips are especially effective in vaulted kitchens, where they link the horizontal counter geometry to the vertical volume above.
Adjustable recessed gimbals and slope-rated housings
When you need unobtrusive ambient light on a steep slope, a directional gimbal trim lets you aim the beam at the floor or a feature rather than washing it into the ceiling. Standard recessed trims point straight down, which on a slope means the beam hits the wall. Gimbals solve that.
Track and multi-directional spot heads
Track lighting suits irregular vault shapes and rooms where you want to highlight art, exposed beams, or architectural details. The heads swivel independently, so one track run can serve multiple purposes. It is also the easiest system to reconfigure after installation.
Wall sconces, uplighting, and cove LEDs
These are the fixtures most homeowners forget, and they make the biggest difference to shadow depth. A pair of wall sconces at 5–6 ft height anchors the vertical surface and keeps the lower half of the room from feeling dim while the upper vault is lit. Cove LEDs tucked behind decorative moulding or coving details wash the ceiling surface with soft, diffused light and make the vault feel intentional rather than cavernous.
Pro Tip: Never rely on recessed cans alone in a vaulted space. Without wall-level or pendant-level light, the lower half of the room stays shadowy no matter how many cans you install above.
3. Sloped-ceiling adapters and mounting hardware explained
Getting a fixture to hang straight from a slope takes the right hardware. Here is what each option does.
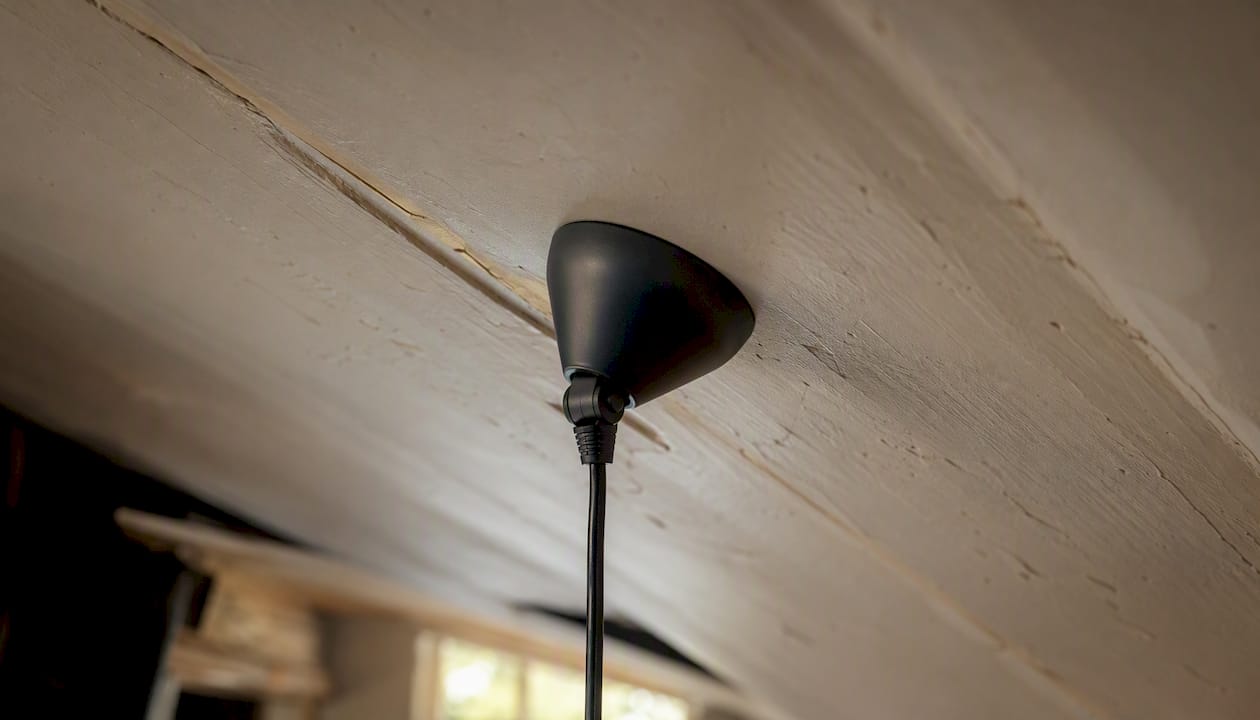
A sloped-ceiling canopy is an angled plate that covers the junction box and lets the fixture hang plumb even when the ceiling surface tilts. Most come in fixed angles (typically up to 45°) or swivel versions that adjust to any slope. Check the product spec sheet before ordering; not every canopy fits every fixture.
A canopy box (sometimes called an apex box) is used when you want to mount at the peak of a cathedral ceiling. It sits flush at the ridge and lets a chandelier drop straight down from the highest point. This is the cleanest look for symmetrical vaults.
Cable-guiding hooks and swag hardware work when the junction box cannot be moved to the peak. You hang the fixture from its intended location and guide the cord or cable to a hook at the peak, then down the slope to the wall. It is a practical workaround, though it is more visible than a canopy box.
For pendant lights, sloped-ceiling canopies or adjustable drops let most modern pendants hang straight. Wire grippers and downrods help fine-tune the drop length after installation.
Pro Tip: When ordering a chandelier for a sloped or peaked ceiling, confirm the canopy diameter and the maximum slope angle it accommodates. Crystorama fixtures, for example, include spec notes on canopy fit that make this check straightforward.
A quick compatibility checklist before you order:
- Chain, rod, or cord suspension? (Rod suspensions are easiest to adjust for drop length.)
- Canopy diameter: does it cover the junction box fully?
- Maximum slope angle the canopy accommodates.
- Junction box rated for the fixture’s weight.
- Structural anchor confirmed (not just drywall).
When the junction box needs to move, or when you are adding a structural anchor during a renovation, that work belongs to a licensed electrician. Planning the box location before drywall goes up saves significant cost later.
4. Practical placement and spacing rules for vaulted ceilings
Concrete numbers make layout planning much easier. These are the most reliable rules of thumb.
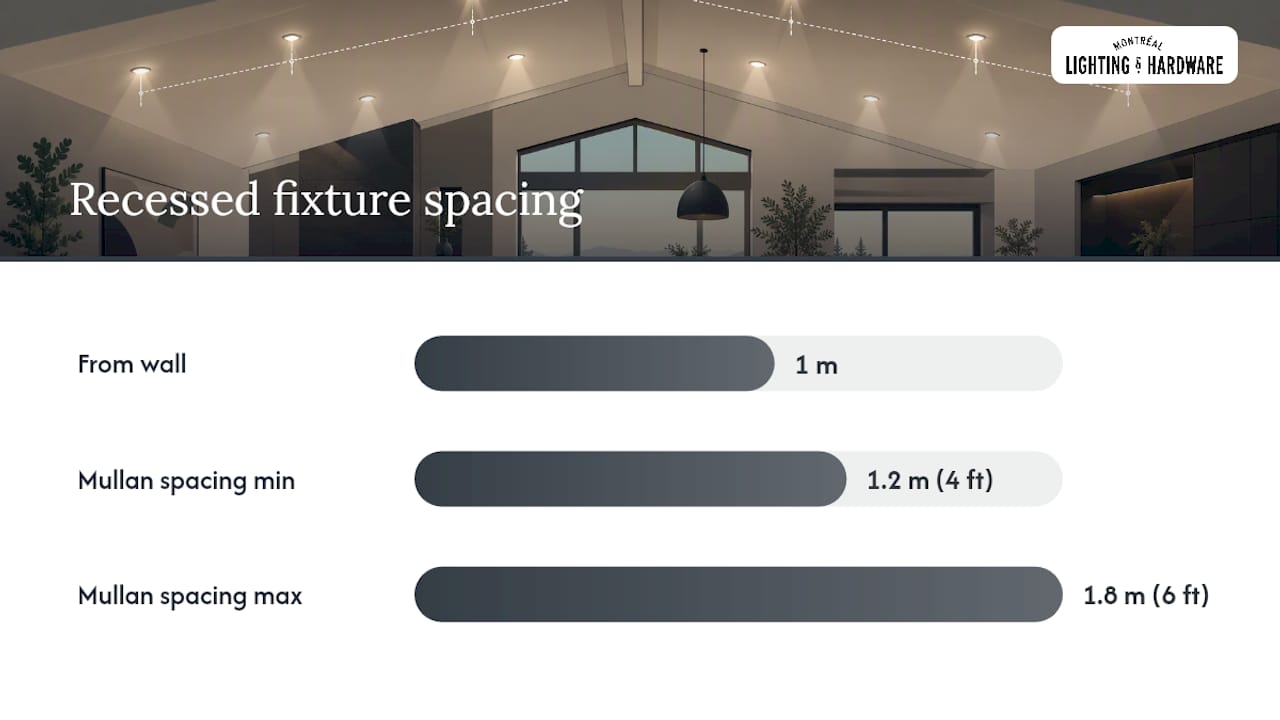
Recessed fixture spacing: Place fixtures roughly 1 m from the wall to minimize harsh shadows along the perimeter. Between fixtures, use approximately half the ceiling height as your spacing distance. For example, a 10-foot ceiling calls for around half that in spacing. PacLights’ recessed layout guidance supports this approach, and Mullan Lighting recommends spacing recessed fixtures 1.2–1.8 m (4–6 ft) apart for even coverage.
Pendant hang height: The bottom of a pendant over a dining table should sit 28–34 inches above the table surface. Over a kitchen island with no seating, 36–40 inches works well. In an open vaulted room with no table below, aim for the bottom of the fixture to land at roughly 7 ft above the finished floor so it reads at eye level from a standing position.
Chandelier placement in a great room: Center the fixture over the primary seating arrangement, not the geometric center of the room. In rooms with a fireplace, the seating group usually defines the “center” more accurately than the walls do.
Here is a measurement checklist you can hand directly to your electrician:
- Peak height at the proposed fixture location (in feet and inches).
- Ceiling slope: rise in inches per 12 inches of run.
- Distance from proposed junction box to nearest wall.
- Room width and length at floor level.
- Desired bottom-of-fixture height above finished floor.
- Insulation type in the ceiling cavity (blown, batt, or none).
5. How to size a chandelier or pendant for a vaulted room
The most widely used starting point: convert your room’s width in feet directly to inches for a minimum fixture diameter. A room that is 14 ft wide calls for at least a 14-inch chandelier. In a vaulted space, that number is almost always a floor, not a target. Proportion and multi-tier form matter more than strict diameter matching when the ceiling climbs past 12 ft.
Vertical scale is the dimension most homeowners underestimate. A fixture that looks substantial in a showroom can read as a small dot when hung at a 20-ft peak. The fix is height, not width: choose a multi-tier or branching chandelier that extends 24–36 inches vertically so it occupies the visual space between the ceiling and the seating plane.
Here is a practical sizing sequence:
- Measure room width and length in feet. Add them together. That sum in inches is a good target diameter for a single large fixture.
- For ceiling heights above 12 ft, add 3 inches of fixture diameter for every additional foot of height beyond 12 ft.
- Confirm the fixture’s overall hanging length (canopy to bottom) fits the space with at least 7 ft of clearance above the finished floor.
- If the result feels large, trust it. Designers consistently report that the correct proportion feels oversized at first.
Pro Tip: When in doubt between a single-tier drum and a multi-tier branching form, choose the multi-tier. It extends vertically, stays readable from the seating plane, and fills the volume without requiring an enormous diameter.
6. Bulbs, color temperature, dimming, and layering light in tall spaces
LED modules and retrofit bulbs are the right choice for vaulted ceilings. Heat rises, and a fixture at 16 ft accumulates warmth faster than one at 8 ft. LEDs run cooler, last longer, and reduce how often you need to climb a ladder for a bulb change.
For color rendering, specify CRI 90 or higher in living rooms, dining areas, and bedrooms where you want wood tones, textiles, and skin tones to look natural. CRI 80 is acceptable in utility spaces and hallways.
Color temperature by room:
- Living rooms and bedrooms: 2700–3000K. Warm, amber-toned light that feels relaxed and residential.
- Kitchens and home offices: 3000–3500K. Slightly cooler, which improves task visibility without feeling clinical.
- Accent and art lighting: Match the ambient temperature or go slightly warmer (2700K) to make finishes glow rather than flatten.
Dimming is not optional in a large vaulted space. A single brightness level cannot serve a dinner party, a quiet evening, and a bright morning all at once. Multi-zone dimming lets you control the chandelier, recessed layer, and wall sconces independently. Confirm that your LED fixtures and bulbs are listed as compatible with your chosen dimmer before purchase; not all LED drivers respond well to every trailing-edge or leading-edge dimmer.
Layering the three light types gives you full control:
- Ambient: Large central fixture or recessed grid provides overall illumination.
- Task: Pendants over islands, linear fixtures over counters, and reading sconces deliver focused light where you work.
- Accent: Adjustable gimbals, wall uplights, and cove LEDs highlight architecture, art, and texture.
Pro Tip: For fixtures at 14 ft or higher, specify LED modules rather than replaceable bulbs wherever possible. Integrated LEDs rated for 50,000 hours mean you are not changing bulbs at height for years. When replaceable bulbs are unavoidable, keep a rope gripper or bulb-changing pole on hand.
7. Room-by-room lighting ideas for vaulted spaces
Vaulted living room or great room
A multi-tier chandelier centered over the seating group is the anchor. Pair it with a recessed grid spaced at roughly half the ceiling height, and add wall sconces at 5–6 ft on the perimeter walls. If the room has a fireplace, flank it with sconces or directional gimbals to draw the eye toward the hearth without competing with the central fixture.
Kitchen with a vaulted ceiling
Linear pendants over the island at 36–40 inches above the counter surface handle task light. Slope-rated recessed gimbals in the ceiling provide ambient coverage. Undercabinet LED strips fill in the work surface without adding ceiling clutter. Keep all three zones on separate dimmer circuits so you can shift from bright prep mode to warm dining mode without rewiring.
Foyer or entry with a high ceiling
This is where an oversized chandelier earns its place. A foyer that is 8 ft wide and 14 ft tall can carry a fixture 18–22 inches in diameter with a drop that brings the bottom to roughly 7 ft above the floor. The visual impact on entry is worth the scale. The Crystorama Dakota Eight Light Ceiling Mount is a strong example of a multi-light fixture proportioned for exactly this kind of tall, narrow volume.
Bedroom with a vaulted ceiling
Lower-hung pendants flanking the bed replace the need for a large central fixture. A medium chandelier scaled to the bed footprint (roughly 1.5 times the headboard width in diameter) works well centered over the bed rather than the room. Bedside sconces at 48–54 inches above the floor reduce reliance on ceiling height entirely and keep the light warm and personal.
Pro Tip: In a bedroom with a steep vault, resist the urge to center a fixture at the peak. A fixture hung at the peak of a 14-ft bedroom ceiling is too far from the bed to feel intimate. Drop it lower, or use pendants on either side of the headboard instead.
8. Electrical safety, IC-AT ratings, and Canadian installation notes
Safety and code compliance are not afterthoughts in vaulted ceiling work. The ceiling cavity in a Canadian home is almost always insulated, and that changes which recessed housings you can legally install.
IC and IC-AT ratings: An IC-rated housing can be in contact with insulation. An IC-AT housing adds an air-tight seal, which is required in most Canadian climate zones to prevent warm air from escaping into the attic through the fixture. Slopes past a 3/12 rise-to-run ratio require slope-rated or adjustable gimbal housings; standard straight-bore housings are not appropriate on steep vaults. Using the wrong housing type can void your home insurance and create a fire risk.
When to call a licensed electrician:
- Any time the junction box needs to be relocated or a new structural anchor is required.
- When adding circuits for multi-zone dimming.
- When the fixture weight exceeds the existing box rating.
- When you are unsure of the insulation type or depth in the ceiling cavity.
- Before any work that requires an electrical permit under your local authority.
Pro Tip: Ask your electrician to install a service loop (extra wire length coiled inside the box) when roughing in for a chandelier. It makes future fixture swaps much easier and costs almost nothing at rough-in stage.
Accessibility matters at height. Specify a fixture-lowering device or a chandelier lift for any fixture hung above 12 ft if you want to change bulbs or clean the fixture without renting scaffolding. These devices mount in the ceiling and let the fixture lower on a cable to a comfortable working height.
A quick installer checklist:
- Measure and record ceiling slope (rise/run).
- Confirm junction box location and structural anchor.
- Verify insulation type; specify IC-AT housing if required.
- Confirm dimmer compatibility with LED driver.
- Note fixture weight; confirm box rating matches or exceeds it.
9. Montreal Lighting & Hardware’s perspective on scale, brands, and trade support
Getting the scale right in a vaulted space is the single decision that separates a room that feels finished from one that feels unresolved. A fixture that is too small reads as an afterthought. One that is too large without the right vertical form overwhelms the room. The sweet spot is a fixture that anchors the seating plane while leaving the vault to breathe above it.
Montreal Lighting & Hardware stocks three designer brands that consistently perform well in vaulted installations:
- Crystorama: Known for multi-light ceiling mounts and chandeliers with dimensional forms that read well at height. The Hulton Six Light Chandelier and the Meridian Six Light Ceiling Mount are good starting points for rooms with 12–16 ft peaks.
- Savoy House: Offers a wide range of fixtures with extended downrod options, making them well suited to double-height spaces where drop length needs to be customized.
- Maxim: Strong in recessed and semi-flush options with slope-rated compatibility notes, useful for filling in the ambient layer around a statement chandelier.
The trade program at Montreal Lighting & Hardware gives design professionals and contractors access to exclusive pricing, dedicated support, and showroom consultations. For homeowners, the product pages include canopy and rod compatibility notes that let you confirm fit before ordering.
Pro Tip: Before placing an order for a vaulted ceiling project, check the product page’s spec sheet for maximum slope angle and canopy diameter. Those two numbers tell you whether the fixture will work with your ceiling before it arrives at your door.
10. What lighting designers get right that most homeowners miss
The most common mistake on vaulted ceiling projects is treating the space like a flat ceiling with more room. It is not. The volume above you is an active part of the design, and the lighting plan has to account for it deliberately.
Do:
- Plan lighting placement before drywall. Moving a junction box after the fact costs far more than getting it right during rough-in.
- Scale fixtures to room proportion, not to what feels comfortable in a showroom.
- Use adjustable gimbals on any slope steeper than 3/12.
- Add wall-level light on every wall that faces a seating area. It counters the shadow depth that tall ceilings create.
Don’t:
- Under-size the statement fixture. A 12-inch pendant in a 20-ft great room is invisible.
- Rely solely on recessed cans. They provide ambient light but no visual warmth or focal point.
- Mix color temperatures across zones. A 2700K chandelier and 4000K recessed cans in the same room create a dissonant, unsettled feeling.
- Forget maintenance access. A fixture at 18 ft that requires scaffolding to service will go years without cleaning or bulb changes.
One shortcut designers use consistently: when a vaulted ceiling feels too tall and cold, a multi-tier chandelier with downward-facing arms visually “lowers” the perceived ceiling height without any structural change. The eye follows the fixture’s lowest point, not the peak above it.
11. Where to find the right vaulted ceiling fixtures in Canada

Montreal Lighting & Hardware stocks designer fixtures scaled for tall volumes, with slope-compatible hardware and trade pricing available across Canada. Whether you are planning a great room chandelier, a foyer statement piece, or a full recessed layout for a sloped kitchen ceiling, the catalog includes options from Crystorama, Savoy House, and Maxim with the spec detail you need to confirm compatibility before ordering.
The Crystorama Hulton Two Light Ceiling Mount is a practical starting point for lower vaulted areas or secondary rooms where a full chandelier is more than the space needs. For larger volumes, the Crystorama Dakota Eight Light Ceiling Mount brings the multi-light scale that tall foyers and great rooms call for.
Trade professionals can access exclusive pricing and showroom support through the trade program. Homeowners can browse the full collection, check canopy and rod specs, and reach the team for pre-purchase advice at Montreallighting.
Sources
- How to Light a Room with a Sloped or Vaulted Ceiling | Mullan Lighting
- Pot Lights for Vaulted Ceilings: How to Choose, Space & Spec Them Right - RC Lighting
- 20 Stunning Vaulted Ceiling Lighting Ideas for Modern Homes - Your House and Garden
- Designing a lighting plan with recessed can lights for vaulted ceilings for maximum effectiveness - PacLights
Recommended
- Best Bathroom Vanity Lights for Canadian Homeowners – Montreal Lighting & Hardware
- Hulton Two Light Ceiling Mount | Crystorama – Montreal Lighting & Hardware
- Fulton Three Light Ceiling Mount | Crystorama – Montreal Lighting & Hardware
- Fulton Six Light Ceiling Mount | Crystorama – Montreal Lighting & Hardware
