Menu title
This section doesn’t currently include any content. Add content to this section using the sidebar.

Whether you’re an amateur decorator or a seasoned trade professional, choosing the right lighting fixture or ceiling fan for your space and properly installing it in your home are very important elements to consider in order to achieve your interior design and home improvement goals. Our How-To Guides were created to answer some of our customers’ most frequently asked lighting questions and concerns. Through the help of our diagrams and lifestyle application shots, our team at Montreal Lighting & Hardware is here to support you every step of the way. Jump to Ceiling Fans
When choosing a fixture for any hanging application, always take into consideration the “overall height”. This is the measurement of the fixture not including the chain (stems) or canopy. When doing your calculation, always keep in mind the minimum height over the table, while allowing for at least of 12” of chain or stems.


Chandeliers look best when they are approximately ¾ the width of the table they are hanging over. Allow for a minimum of 30” between the bottom of the fixture and the surface of the table.


Choose a fixture that is 50% - 75% the diameter of your round table. You should allow 30” – 36” between the bottom of the fixture and the surface of the table.


Always consider proportion when selecting a linear fixture. Your fixture should not exceed 2/3 the length of the surface it is hanging over. For extra long surfaces, sometimes 2 linear fixtures are required. Allow 30” – 36” between the bottom of the fixture and the surface it is over.


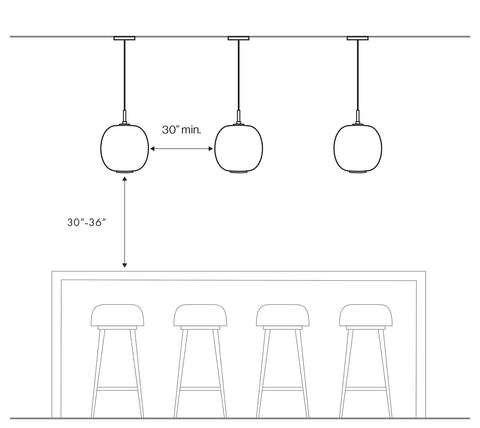
Allow for 30” – 36” between the bottom of your pendant and the surface of your counter. When using multiple pendants, allow for a minimum of 30” spacing between the widest points of the fixtures.


It is important that your fixture does not hang where it can interfere with any nearby doors. Allow for a minimum of 7’ from the bottom of the fixture to the floor. In a center hall, consider the height of the tallest person that will be walking under your fixture.


In rooms with ceiling heights of 10’ or more, pay close attention to the proportion of the fixture to your space. Allow for a minimum of 8’ from the bottom of the fixture to the floor surface. The fixtures “overall height” measurement will play a large role when making your selection.
When choosing a wall fixture, be wary of the size of the mounting canopy. Most are meant to mount on a standard 4” round junction box. However, some have a smaller mounting plate and are to be mounted on 2” x 4” “switch” boxes. As well on these, be conscious of whether they are mounted horizontally or vertically.


Multiple sconces in your hallway, living room, or dining room, will add beautiful accent lighting to your space. Adequate lighting for this purpose should be based on a minimum of 8’ between sconces.


These sconces have a dual purpose. While adding extra light to your bedroom when needed, they are also commonly used as reading lights. If the sconce is operated by a switch on the light, it is advisable that the switch is within easy reach. Swing-arm sconces are popular for this reason. If the sconce is controlled by a remote switch in your wall, install this switch close to your bed. Bedside sconces are typically mounted 55” – 60” from the top of the sconce to the floor surface.


Vanity lights to be installed over a bathroom mirror should be approximately ¾ the width of the mirror. NEVER should the sconce be wider than the mirror.


Sconces installed beside a mirror should be mounted 60” – 66” high from the center of the back plate to the floor surface.


Picture lights should be approximately 50% the width of the picture frame. If size options are not available, you can go to 75% the width of the frame. NEVER surpass the total width of the frame. The light should be tilted at approximately 30 degrees to give optimum coverage of the artwork.


Exterior wall lanterns should be about 25% the height of the adjacent door including the door frame. They should be mounted about 60”- 66” from the ground so that the center of the fixture is about level with your eyes. If there is only one lantern, ideally it should be mounted on the door handle side of the door.


Center the sconce above the door. The lowest part of the sconce should be about 6” above the door frame. For a hanging lantern, the general rule is that the bottom of the fixture is no lower than the door frame.
What is the right size fan for my room? Ceiling fan size is determined by its diameter. To find the diameter, we measure from the end of one blade to the end of the opposite blade. The most common fans range from 42" – 55" in diameter. Base the size ceiling fan you should choose on the size of the room it will be placed in. Use this chart as a reference to find the right size ceiling fan for your room.


Smaller Rooms: Rooms that are no more than 8' x 10' should have ceiling fans between 21" and 40" in diameter. Smaller rooms include dens and breakfast nooks.
Medium Sized Rooms: If your room is up to 12' x 14', select a fan that is 42" – 54" in diameter. Medium size rooms include bedrooms, dining rooms, and kitchens.
Larger Rooms: A room that is up to 18' x 20' require a fan that is 52" – 60" in diameter. These include family rooms and large bedrooms.
Great Rooms: Great rooms are more than 18' x 20' and should include a fan more that is larger than 60" in diameter. Great rooms are characterized by open floor plans and large foyers. They often have higher than average ceilings.


Different mounting systems are available for most fans depending on the ceiling on which they are being installed. Factors include ceiling height and slope (or angle). Here are the three mounting systems available to accommodate your situation. Please note that the best height to mount most fans is between 7’ and 9’ from the floor for optimal airflow.
Flush Mount (For lower ceilings): This mount type has the ceiling fan connected directly to the ceiling. A flush mount is recommended if your ceiling is under 8' high.
Downrod Mount (for higher and sloped ceilings): A downrod mount has a pole that connects the fan to the ceiling. The poles (or downrods) are available in many different lengths. Use the following charts to determine how long your fan's downrod should be depending on the room's ceiling height and angle. Please note that the canopies on this system are designed to accommodate angled ceilings.


For sloped ceilings, a sloped ceiling mount is available for most fans. They are designed so that the fan hangs straight, and the blades do not hit the ceiling or the walls. The mount consists of a regular downrod and a special sloped ceiling adapter that firmly attaches to your ceiling. The downrod's length will vary depending on the slope of your ceiling and the size of your fan's blades. Always calculate your placement and drop so that the edge of your fan blade is at least 18” from your wall.

In order to calculate the slope of your ceiling, divide the rise by the run. The rise is the difference between the highest point from the floor to the ceiling and the lowest point from the floor to the ceiling. The run is the length between these two points.
Rise = A − B
Run = C
Slope (°) = Rise / Run or (A − B) / C
Once you know the slope of your ceiling, use the following chart as a reference for the length of the downrod that you will require. Note that your fan still needs to be at least 18" away from the nearest wall and 7' above the floor.

110% Price Guarantee
Free Delivery Over $199
Quick & Easy Returns
Leading Brands
